
Here’s the scenario you find yourself in: you’ve built and deployed a cool little Django app, and successfully deployed it on Heroku. You’ve followed all the great advice out there and are using django-environ to help manage all the various configuration variables you have to retrieve from your Heroku dynos. You’re running either a free or hobby account, because you wanted to keep costs low, but now you’ve already had to upgrade your PostgreSQL database because the free and hobby levels of those offerings are less than stellar. You’re also seriously considering trying to publicize your app more and your staring down the barrel of the price leap to Standard dynos so that you can deal with horizontal scaling, and your affordable solution is about to get a lot less affordable.
If you’re sitting on a bunch of VC money, or money isn’t an issue, you may want to stay with Heroku for the ease of use. But, if you’d like to shave some costs, and get some nice performance boosts at the same time, you may want to consider moving to AWS. This can be daunting as the AWS console is not for the faint of heart, and the interpreting all the pricing vs specs can truly turn your mind to mush. AWS does have a somewhat more friendly PaaS equivalent offering called Elastic Beanstalk, which does abstract away a lot of details for you and speeds up deployments, but it’s still far behind Heroku’s CLI in terms of ease of use.
If you’re willing to put a little extra time in at the beginning though, you’ll find you can get some really nice features, increased flexibility, and comparable or cheaper costs with more resources behind them. This will of course depend a lot on your application, and what choices you make.
What you need to know #
This guide is written assuming that you already have a working Django site deployed on Heroku, which means you’ve already adopted 12-factor methodology for configuring and deploying your app, and that you’re using a PostgreSQL database as your backend. Other assumptions that are taken into account is that you’re using django-compressor as an asset pipeline (in offline mode), and that try as you might to avoid it, you are using npm to manage your Javascript libraries and their dependencies.
We’re also going to assume you’d like to adopt some good security practices that Heroku already does for you, with an added bonus of making the database a bit more secure than the Heroku default as well.
This also assumes you’ve already installed the Elastic Beanstalk CLI.
A note on network security #
Elastic Beanstalk, if left to default settings will make some reasonable choices that enables you to set up and configure your app quickly. Unfortunately, this means that a lot of your instances will get a public IP address by default, placing them within the DMZ. This can be very helpful in the beginning while you are figuring things out, but please for the love of all that is holy don’t go to production with this. This guide will assume you want to jump straight to the most secure settings.
Create an IAM user for your environment #
You’ll want to create a limited IAM user for Elastic Beanstalk to use when deploying your app. This policy is a very good starting point for that.
Setting up your Virtual Private Cloud #
If you don’t want every instance to be available to the whole world, you’re going to want to configure a Virtual Private Cloud (VPC) in AWS. This isn’t too difficult, and luckily there is a shortcut available via CloudFormation. Download this template to your machine and edit it to match your needs, i.e., any specific private IP ranges you’d prefer to use. By default, this creates two public subnets and two private subnets for the specified region, but you may prefer to add additional subnets for each of the available availability zones in your region. You can either do this by editing the template, or you can do it via the AWS console after generating the prewritten template. The template format is out of scope of this tutorial, so we’ll move forward with the latter option.
In your AWS console, navigate to CloudFormation and click the Create Stack button. From the following page, choose the “Upload a template to S3” option and select the file you downloaded in the step before.

In the following page, choose a memorable name for this stack, and then click Next. On the final page, add in the ARN you noted from the IAM user you created above, and then create the stack. This will take a few minutes while it sets up all the subnets and network interfaces.
Add additional subnets (optional) #
If you would like to have subnets available in each of the region’s availability zone you can define them now. To do so, go to the [VPC section] of your console and click the Subnets selection from the left menu. For each remaining availability zone in your region, and label them public or private accordingly so that you can keep track of them later.
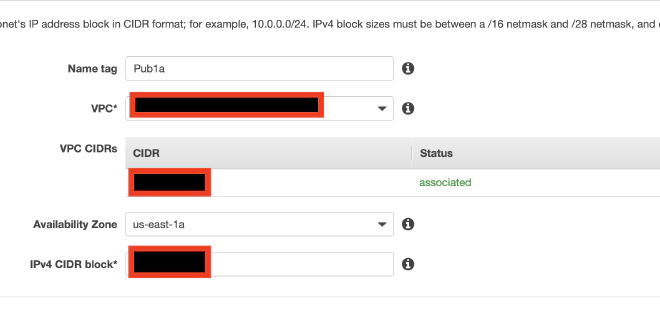
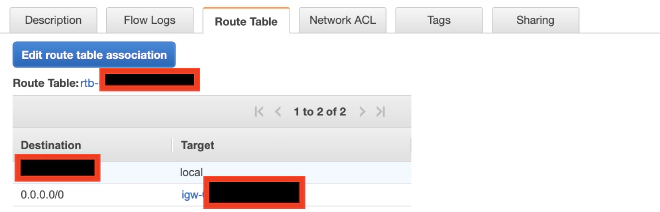
Once all your subnets are created, you’ll need to either make them public or private. For each public subnet you’ll need to edit the setting for “Auto-assign public IPv4 address to ensure that it is enabled, which is available via the actions menu. You’ll then want to check the Route Table for the subnet. You’ll want to make sure that the routing for CIDR 0.0.0.0/0 is pointing to the internet gateway that was created by your template.
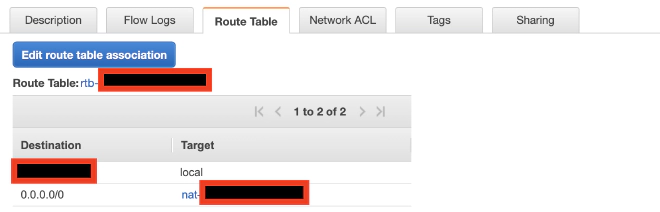
For each private subnet, you want to ensure that the “Auto-assign public IPv4…” option is disabled. You’ll also want to ensure that the Route Table has the route for 0.0.0.0/0 set to the NAT device that was created by your script. If you get stuck, just check the settings of the template generated subnets and mimic them.
Now you have a public and private subnets for each availability zone in your region which can use for your instances as appropriate.
Create a database #
Now, we are getting to the fun part. We’re going to create a PostgreSQL database for our app to talk to, and we’re going to use Amazon’s lovely RDS service to do it. Go to your RDS console and click “Create database”. Select PostgreSQL for your engine and then your use case. If you choose “Production”, when you go to the next screen you will be presented with some default options and a frightening cost estimate. Adjust the options to match your actual use. A default production setting as AWS defines it costs a staggering $757/month, but that’s also way more resources than you need for a hobby site.
Choose the DB instance class that best matches your desired specs, decide on whether you want Multi AZ support and your storage setup. For most apps, general purpose storage is fine, although if it is in your budget you might choose to opt for Multiple AZ support with gives you a hot standby database in a different availability zone with automatic failover. Remember that your EC2 instances are going to be much cheaper than standard Heroku dynos, so you have more of your budget that you can spend here.
Give the instance an identifier and specify your master username and password. You can either use the randomly generated ones Heroku gave you or create your own new ones.
If you want to mimic the Heroku experience of having your database accessible from your local machine, you can use the default settings. However, this will mean that just like with Heroku, your database will be accessible to anyone from anywhere. If not, you’ll want to make sure that you uncheck the option for publicly accessible, and instead associate your instance with the private subnets you defined in the previous section.
On the final page, specify a name for the database, and then click “Create”. This will take a while, especially if you’re spinning up a Multi AZ instance while RDS sets everything up for you.
While it’s spinning up, you can make a quick modification to your instances security group to allow traffic from other instances in the VPC or from a specific security group.
Take a backup of your Heroku database #
While your RDS instance is spinning up, take a backup of your Heroku database. You’ll need to do this again when you do the final migration, but this helps ensure you have adequate data for ensuring your environment is set up correctly.
heroku pg:backups:capture --app [your app name here]
Wait for this backup to complete and then download it to your local machine.
heroku pg:backups:download --app [your app name here]
This will add the file latest.dump to your local directory, which consists of a complete backup of your database.
Set up a (temporary) SSH server #
The overwhelming majority of your network is going to be inaccessible from outside the VPC, so it makes sense to have a disposable server that serves as your SSH gateway into your network. You could configure this as a permanent part of your infrastructure, but it’s much more economical to simply spin it up only when you actually need to connect to something and then terminate it after you are done. Simply spin up a default EC2 instance in one of your VPC’s Public Subnets.
A default AMI of Amazon Linux (AL) is fine here although you can also preconfigure one if you choose. Assuming you’re just creating a stock AL version you can simply follow the EC2 wizard. The only changes you should have to make is to ensure you assign it to the correct VPC and one of your Public Subnets.
Over the course of the install, it will offer to install or create an SSH identity key pair you can use to access the server. It will take a couple minutes to spin up, but then you should be able to access via ssh using:
ssh -i ~/.ssh/[yourprivatekey] ec2-user@[instance IP address]
You can also upload your db copy to the machine by executing from your local machine:
scp -i ~/.ssh/[yourprivatekey] latest.dump ec2-user@[instance IP address]:
If your DB instance is done spinning up, go ahead and SSH back into your SSH server and run sudo yum install postgresql to install to client libraries, and verify that you can connect to your RDS instance.
psql -h [aws-rds-endpoint] -U [master database user] [database_name]
It should prompt you for your password and then connect you using the client. If this step fails, you didn’t make the correct changes to your RDS security group to allow internal traffic and you’ll need to correct this before moving on.
If everything else went well, from the SSH server run:
pg_restore --verbose --clean --no-acl --no-owner -h [aws-rds-endpoint] -U [master database user] -d [database_name] latest.dump
This restore your database backup to your instance ignoring any ACLs defined by a foreign server so that you don’t run into conflicts.
Finish that all off by terminating your SSH instance. You won’t need it again for a good long while so why pay for it?
Make some adjustments to your app #
If you are planning on using a load balancer on AWS, which is always a good idea, it will periodically check the health of your instances to verify that they still functioning. If you are using sensible defaults such as specifying allowed hosts, you may run into some issues. The load balancer will query your instances by their IP addresses, which can of course change if you’re doing any autoscaling, so you’ll need a way to white list a range of IP addresses. You can do this easily by installing django-allow-cidrand configure it for the appropriate IP ranges.
If you also require HTTPS for your site1, you’ll also need to add a url pattern 2to SECURE_REDIRECT_EXEMPT in your settings file that your load balancer can use for health checks. Otherwise, attempts to query the health of your instance via IP address will result in an SSL redirect, but since the redirect will be based on IP address instead of domain name, the certificate will not be validated.
Get an SSL cert #
Speaking of SSL, get yourself a certificate. You can do this easily and for free via DNS verification in AWS, so get ye to yon SSL console and create one for your app domain.
Set up Elastic Beanstalk #
Now that all the base details are out of the way, it’s time to install your app. To begin with you’ll want to make sure you have all the environment variables you need. Run heroku config and note all the env variables displayed. You’ll want to copy them to a text file, e.g. env-prod using the [KEY]="[VALUE]" format with one variable per line. We’ll use this to mirror the settings we need in AWS.
NOTE If you have other add-ons you are using from the Heroku Elements marketplace, you will have to migrate to alternative plans as those will terminate when you destroy your Heroku app. Make sure to figure that out in advance and update your Heroku app accordingly as well as you prep for migration.
Initialize an app #
From your project directory, run eb init. This will install the required configuration files and add appropriate entries to your .gitignore file to prevent artifacts from being added to your repository. You will be prompted to name your application, and it will do the initial setup required.
Add config settings for deployment #
For a basic Django deployment, you could follow the instructions here, but most likely you will have a variety of other elements to consider when deploying your app. For example, we’re assuming that you also have some node packages to install and you want to run your Django-compressor installation in offline mode. To make sure all that happens, you’re going to need to add a some config files, which serve a similar role as buildpacks in Heroku.
First, we need to make our extensions folder so the CLI can find it.
mkdir .ebextensions
Then you are going to create a file called deploy.config, which is a YAML file. It should look like this:
commands:
  01_yum_update:
    command: "sudo yum update -y"
  02_install_git:
    command: "sudo yum install -y git"
  03_install_build_tools:
    command: "sudo yum install -y gcc-c++ make"
  03_install_nodejs_repo:
    command: "sudo curl -sL https://rpm.nodesource.com/setup_10.x | bash -"
  04_install_nodejs:
    command: "sudo yum install -y nodejs"

container_commands:
  01_migrate:
    command: "django-admin.py migrate"
    leader_only: true
  02_npm_install:
    command: "npm install --production"
  03_staticone:
    command: "django-admin.py collectstatic --noinput"
  04_compressor:
    command: "django-admin.py compress --force"

option_settings:
  aws:elasticbeanstalk:application:environment:
    DJANGO_SETTINGS_MODULE: dotted.path.to.settings
  aws:elasticbeanstalk:container:python:
    WSGIPATH: path/to/wsgi.py
The first section above consists of commands that should be executed on the server prior to deploying the app. Installing git above is optional, but you will need it if any of your application’s dependencies require downloading a VCS version.
The second section consists of commands for use after the application code has been copied to the server. The first command runs any database migrations, and is flagged with leader_only so that it only does it one time per deploy regardless of the number of instances being updated. You can add additional commands as needed for any other management commands you may need to have run.
The option settings tell Elastic Beanstalk where to find the DJANGO_SETTINGS_MODULE, and the second gives it the path to your WSGI file. 3
Commit your changes and let’s get ready to deploy.
Create an environment #
For each app you create on Elastic Beanstalk, you can create an arbitrary number of environments with live instances. You’ll need to create your first one now, and you can either do this via the CLI or via the web interface. Because we like to keep things simple, we’ll use the CLI.
eb create --vpc
You will now be prompted for each setting needed in turn. Over the course of the installation you will be asked:
- Environment name: unique easy to remember name for environment
- CNAME: You can specify this or just take the default.
- Load Balancer Type: choose
2) application - VPC Id: Paste in the id of the VPC you created above.
- Do you want to associate a public IP address?: Choose
nas we don’t want our application servers to be publicly accessible. - Enter a comma-separated list of Amazon EC2 subnets: Paste in a comma-separated list of the ids 4 of the private subnets you defined above.
- Do you want the load balancer to be public?: Select yes.
- ** Enter a comma-separated list of ELB subnets**: Enter a comma separated list of the ids of the public subnets you defined above.
- Enter a comma-separated list of security groups: Any security groups you wish to have added to your instances should have their ids listed here. Elastic beanstalk will create some default security groups regardless.
The CLI will now upload a source archive of your code and begin creating the environment and this will take a bit. Ultimately, the build will fail, because none of those fancy environment variables we defined have been installed yet. Wait out for the build to fail and then run the following (assuming you named the file with the definitions env-prod).
eb setenv `(cat env-prod)`
This will pull all the variables out of your file and set each one into the application environment. You’ll get a warning that your WSGI path points to a file that does not exist, because while the setting is now updated, your code deploy never completed the first time. You can safely ignore it this time.
Now, assuming you are going to be using SSL, we’ll need to tell the load balancer to listen for it. Type eb console to open the web interface to manage your environment. Choose “Configuration” from the left sidebar and then click the modify option under the Load Balancer area.
Click “Add listener” on the next screen and select port 443, protocol HTTPS, and then the SSL certificate that you created above. You can then choose which SSL policy you wish it to use when negotiating with clients. Once you apply your changes, your load balancer will now be listening on port 443, and will terminate encryption for you, and route the request to your instances on port 80 across your private network.
Once the configuration is finished updating you can complete your deployment by running eb deploy. Your application code will be deployed.
From now on, you can do application updates simply by running eb deploy again within the source directory after committing your changes. If you want to prevent any downtime or capacity constraints, you can change your deployment settings in the web console to be “Immutable”, meaning that AWS will spin up one instance first to verify that it can deploy successfully, and then it will spin up any additional replacement instances prior to terminating the instances running the older version.
Finishing touches #
Now that you have your application running successfully, it’s time to update your DNS. You’ll want to select a maintenance window time where you’re not likely to run into issues with users. Consider creating a custom maintenance page that you can display on Heroku while you wait for DNS to propagate.
When you are ready, enable maintenance mode on Heroku with heroku maintenance:on --app [your app name], and then repeat the steps above to retrieve the latest backup of your database and then restore it as before to your RDS instance. Update your DNS host so that the CNAME you were using for Heroku now points to the CNAME value of your Elastic Beanstalk environment. You should keep your Heroku app until you’ve verified that all the DNS changes have propagated around the web, which could take up to 48 hours. However, if you want, you can turn off your dynos in advance.
Once the DNS change is complete you can delete your original Heroku app by running heroku apps:destroy [yourappnamehere].
You’re done! Now you have your app running on AWS, with load balancing, autoscaling, and within a private network. Sit back and enjoy.